개요
MSA 아키텍처에서는 환경설정 파일을 외부에서 관리하여 설정이 바뀐 경우 서비스의 수정, 재컴파일 없이 여러 환경에서 이를 적용할 수 있게 해줍니다.
이를 위해 Spring 프레임워크는 Spring Cloud Config를 제공합니다.
기본 세팅
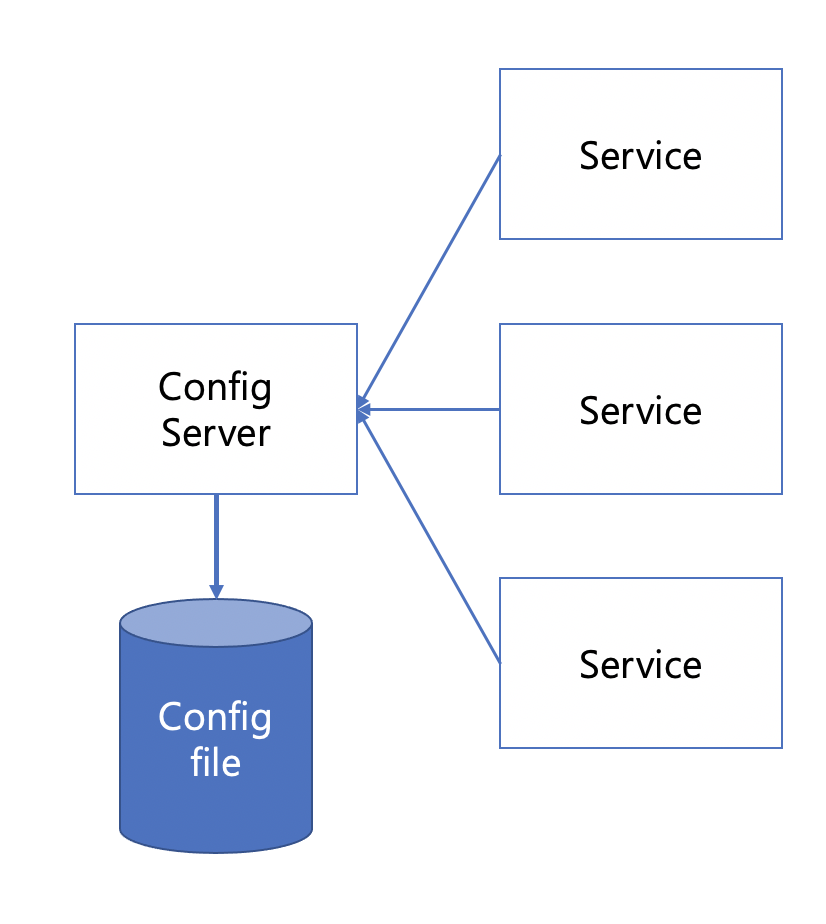
컨피그 서버를 사용하는 경우 구조는 [그림 1]과 같습니다.
컨피그 파일 repository가 존재하며 컨피그 서버는 뜰 때 해당 레포를 바라봅니다.
서비스들은 배포될 때 컨피그 서버에서 배포 시 환경의 환경설정 정보를 가져와서 서버를 띄워줍니다.
spring boot actuator 의 refresh endpoint를 이용하여 config file의 변경점이 있다면 서버 재시작을 하지 않고도 미리 명시해둔(@RefreshScope) 컨피그들은 변경된 정보를 반영할 수 있습니다.
Config File Repository
repository link: https://github.com/fpdjsns/MSA-config-files
config-client-dev.yml 추가
환경이 dev인 config-client 프로퍼티 파일을 추가합니다.
test:
  message: det test 파일이다
Config Server
의존성 추가
dependencies {
    implementation("org.springframework.boot:spring-boot-starter-actuator")
    implementation("org.springframework.cloud:spring-cloud-config-server")
}
server:
port: 8888
spring:
application:
name: config-server
cloud:
config:
server:
git:
uri: https://github.com/fpdjsns/MSA-config-files.gitspring.cloud.config.server.git.url : config file repository git 주소입니다. 퍼블릭 레포로 만들었기 때문에 별도의 인증 정보는 추가하지 않았습니다. 만약 컨피그 파일 레포가 private인 경우 인증 정보를 추가해야합니다.
@SpringBootApplication
@EnableConfigServer
class ConfigServerApplication

fun main(args: Array<String>) {
	runApplication<ConfigServerApplication>(*args)
}
어플리케이션을 컨피그 서버로 사용하기 위해 @EnableConfigServer 어노테이션을 추가해줍니다.
Config Client
컨피그 서버를 참조하여 뜨는 서비스 서버입니다.
의존성 추가
dependencies {
    implementation("org.springframework.boot:spring-boot-starter-actuator")
    implementation("org.springframework.cloud:spring-cloud-starter-config")
}
프로퍼티 추가
server:
  port: 9901

spring:
  application:
    name: config-client
  profiles:
    active: dev
  config:
    import: optional:configserver:http://localhost:8888

management:
  endpoints:
    web:
      exposure:
        include: refresh
spring.config.import : config server 정보를 입력합니다.
management.endpoints.web.exposure.include : actuator의 refresh 엔드포인트를 활성화시킵니다.
프로퍼티 추가
@SpringBootApplication
@ConfigurationPropertiesScan
class ConfigClientApplication

fun main(args: Array<String>) {
    runApplication<ConfigClientApplication>(*args)
}
@RefreshScope
@ConstructorBinding
@ConfigurationProperties(prefix = "test")
data class TestProperties(
var message: String = ""
)test 프리픽스를 가지는 설정들에 RefreshScope 어노테이션을 붙여줍니다.
관련 설정들은 refresh endpoint가 호출될 때 변경을 감지해 서버 재시작없이 반영됩니다.
@Configuration
class TestHandler(
    private val testProperties: TestProperties
) {

    fun test(request: ServerRequest): Mono<ServerResponse> {
        return ok().bodyValue(testProperties.message)
    }
}
@Configuration
class TestRouter(private val handler: TestHandler) {
@Bean
fun testRoute() = router {
"/test".nest {
GET("", handler::test)
}
}
}test.message 를 응답값으로 하는 "/test" endpoint를 추가합니다.
테스트
GET http://localhost:8888/config-client/dev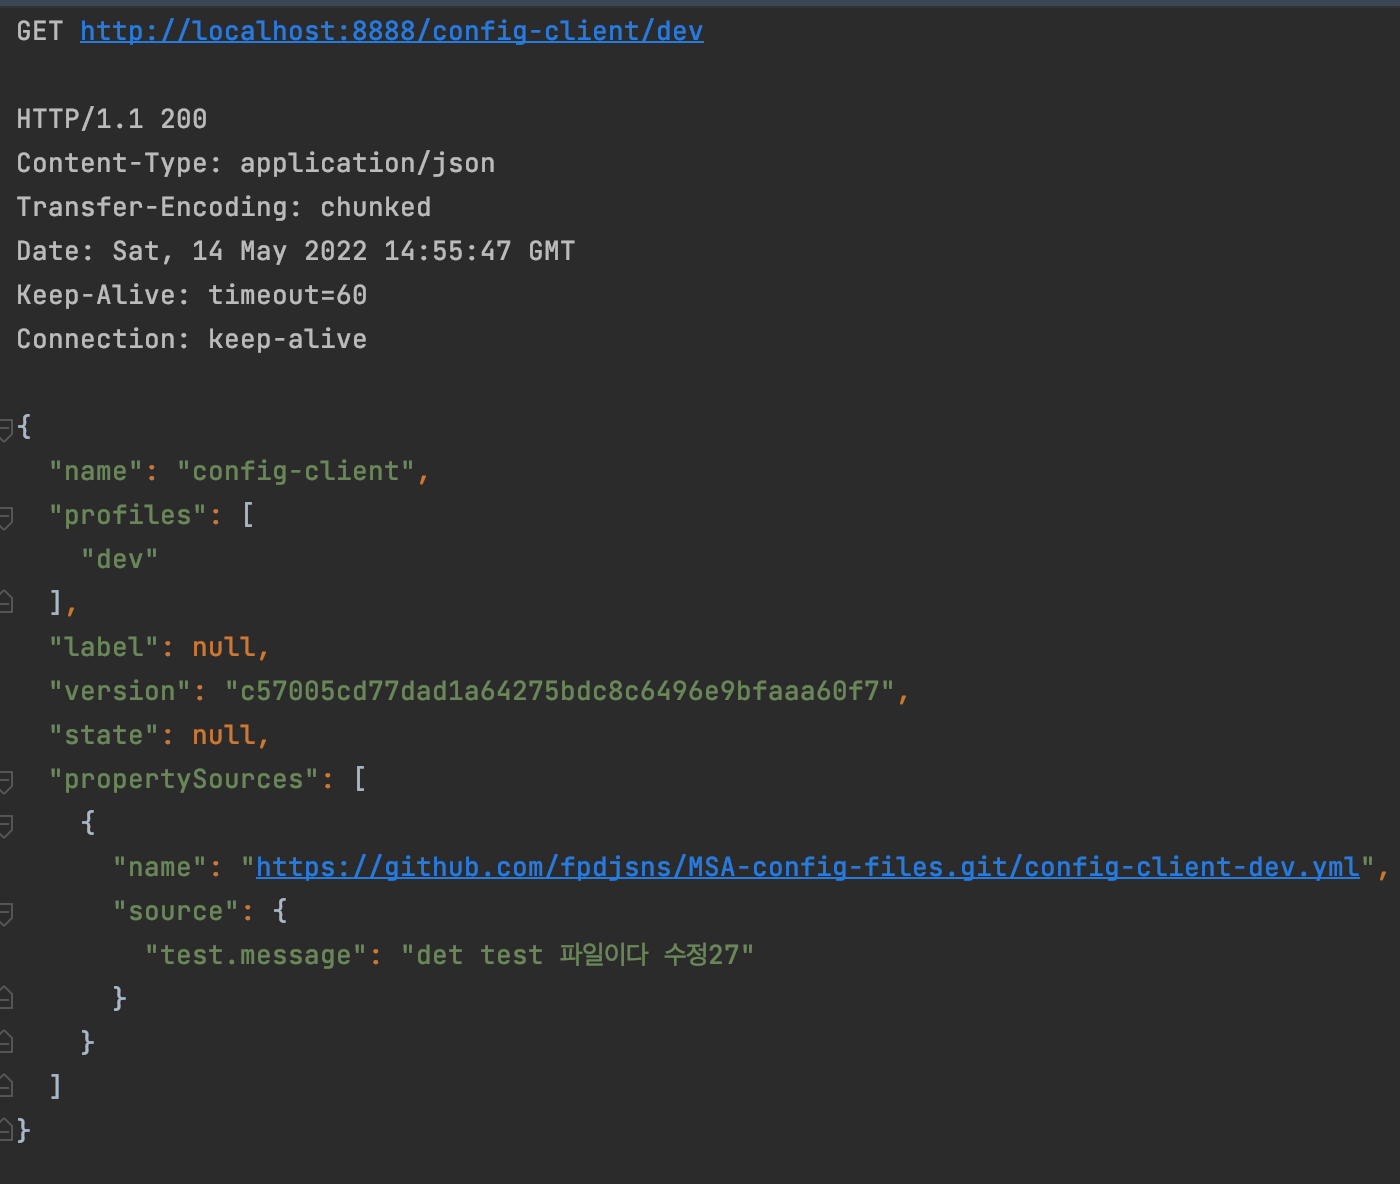
config-client-dev.yml 파일의 정보를 반환합니다.
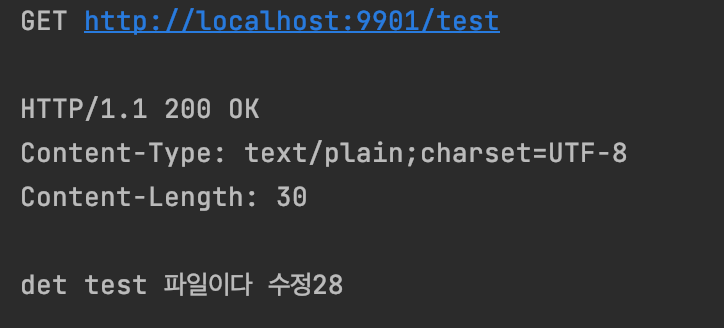
GET http://localhost:9901/test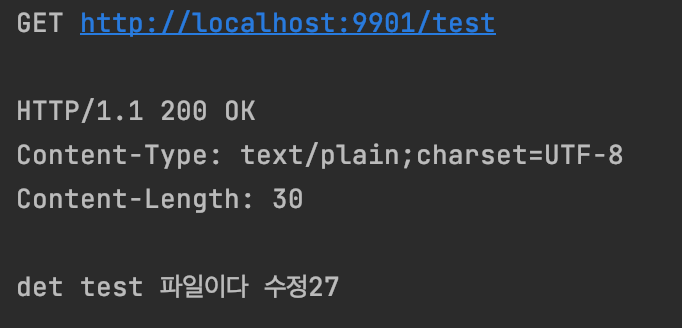
/test 를 호출하면 config-client-dev.yml의 test.message를 잘 받아온 것을 확인할 수 있습니다.
이제 서비스 재시작없이 컨피그 변경 값이 반영되는지 확인해봅시다.
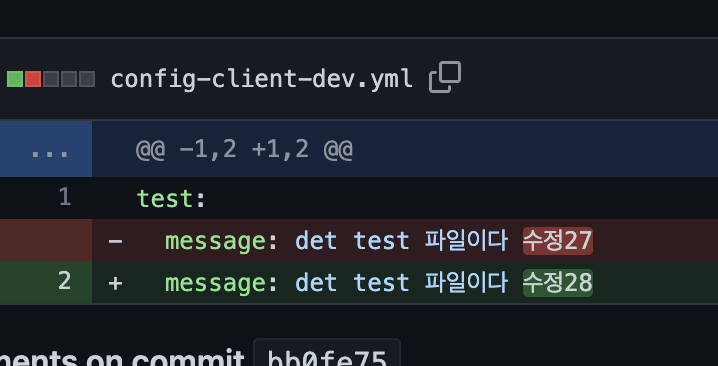
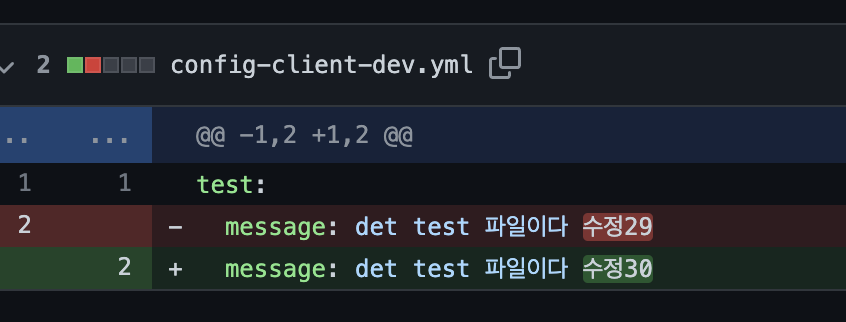
config file을 수정해줍시다.
POST http://localhost:9901/actuator/refresh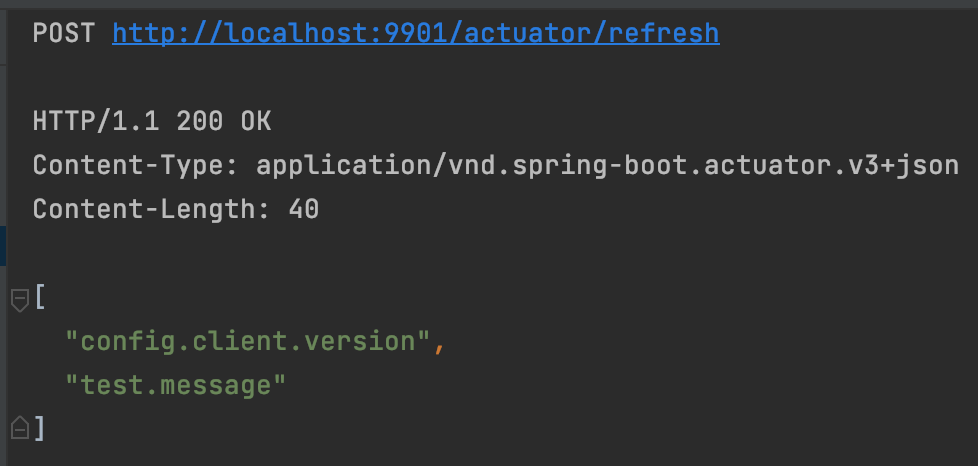
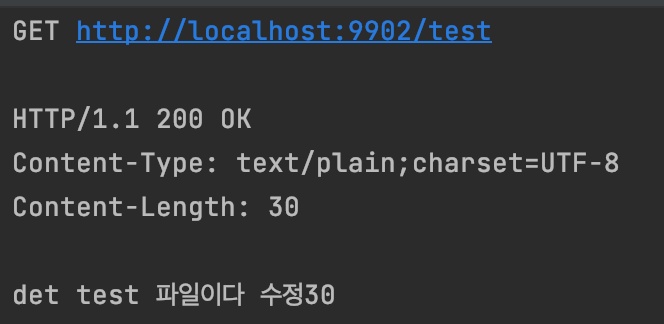
GET http://localhost:9901/testclient server 재시작 없이 /actuator/refresh 호출 후, test endpoint 를 호출해보면
위와 같이 변경 값이 반영된 것을 확인해 볼 수 있습니다.
참고 커밋 : https://github.com/fpdjsns/MSA-Project/commit/ac0a66de9ba09533c2a7ae0ab1755d9dd15be8a1
Spring Cloud Bus
로컬에서 테스트만 할 때는 동일한 어플리케이션 인스턴스를 한 대만 띄우지만 운영환경은 보통 복수대의 인스턴스로 구성되어 있습니다.
Cloud config 만 도입했을 때 A 어플리케이션의 /actuator/refresh 를 호출하기 위해서는 A 인스턴스가 n개가 있다면 n번의 /actuator/refresh API를 호출해야 합니다.
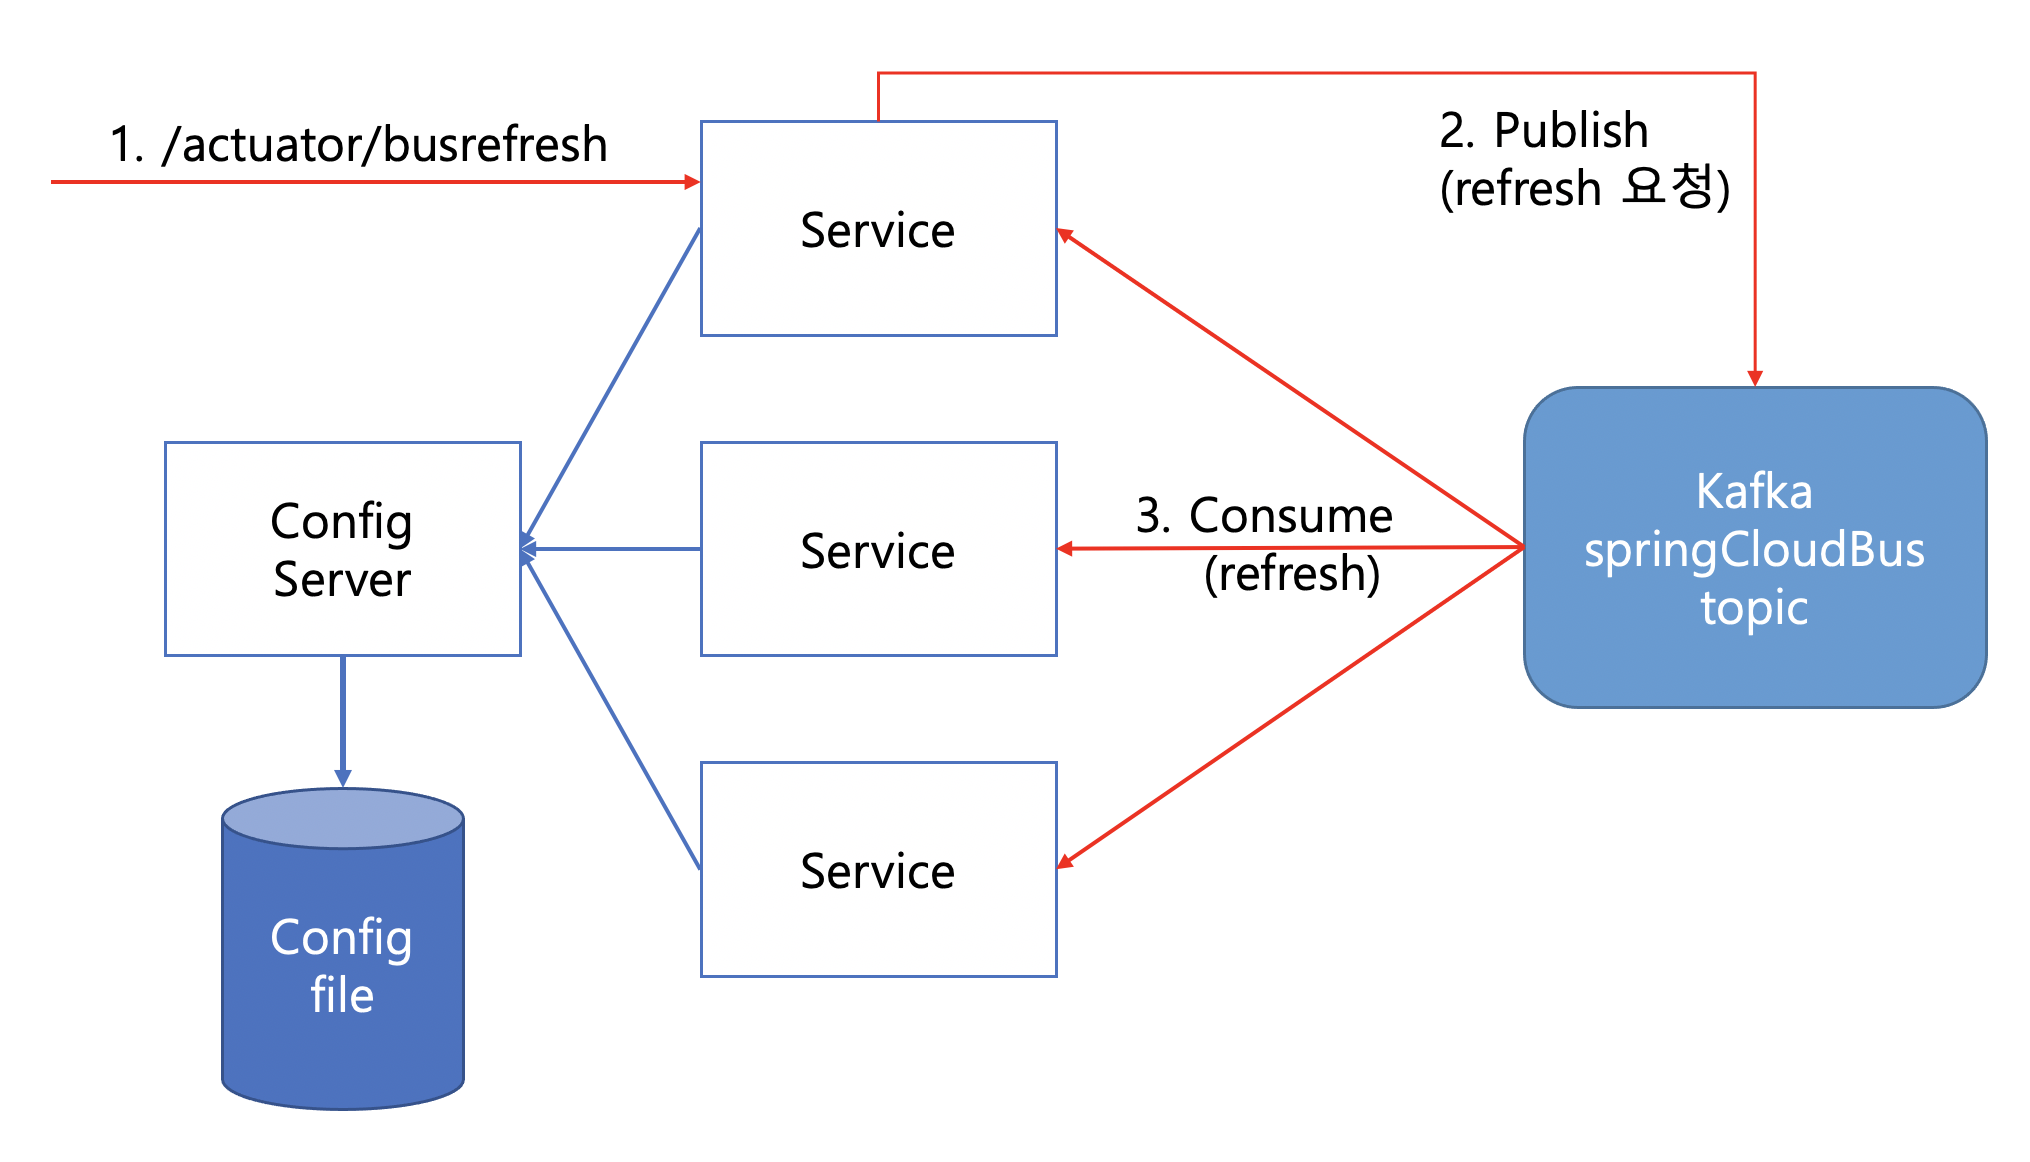
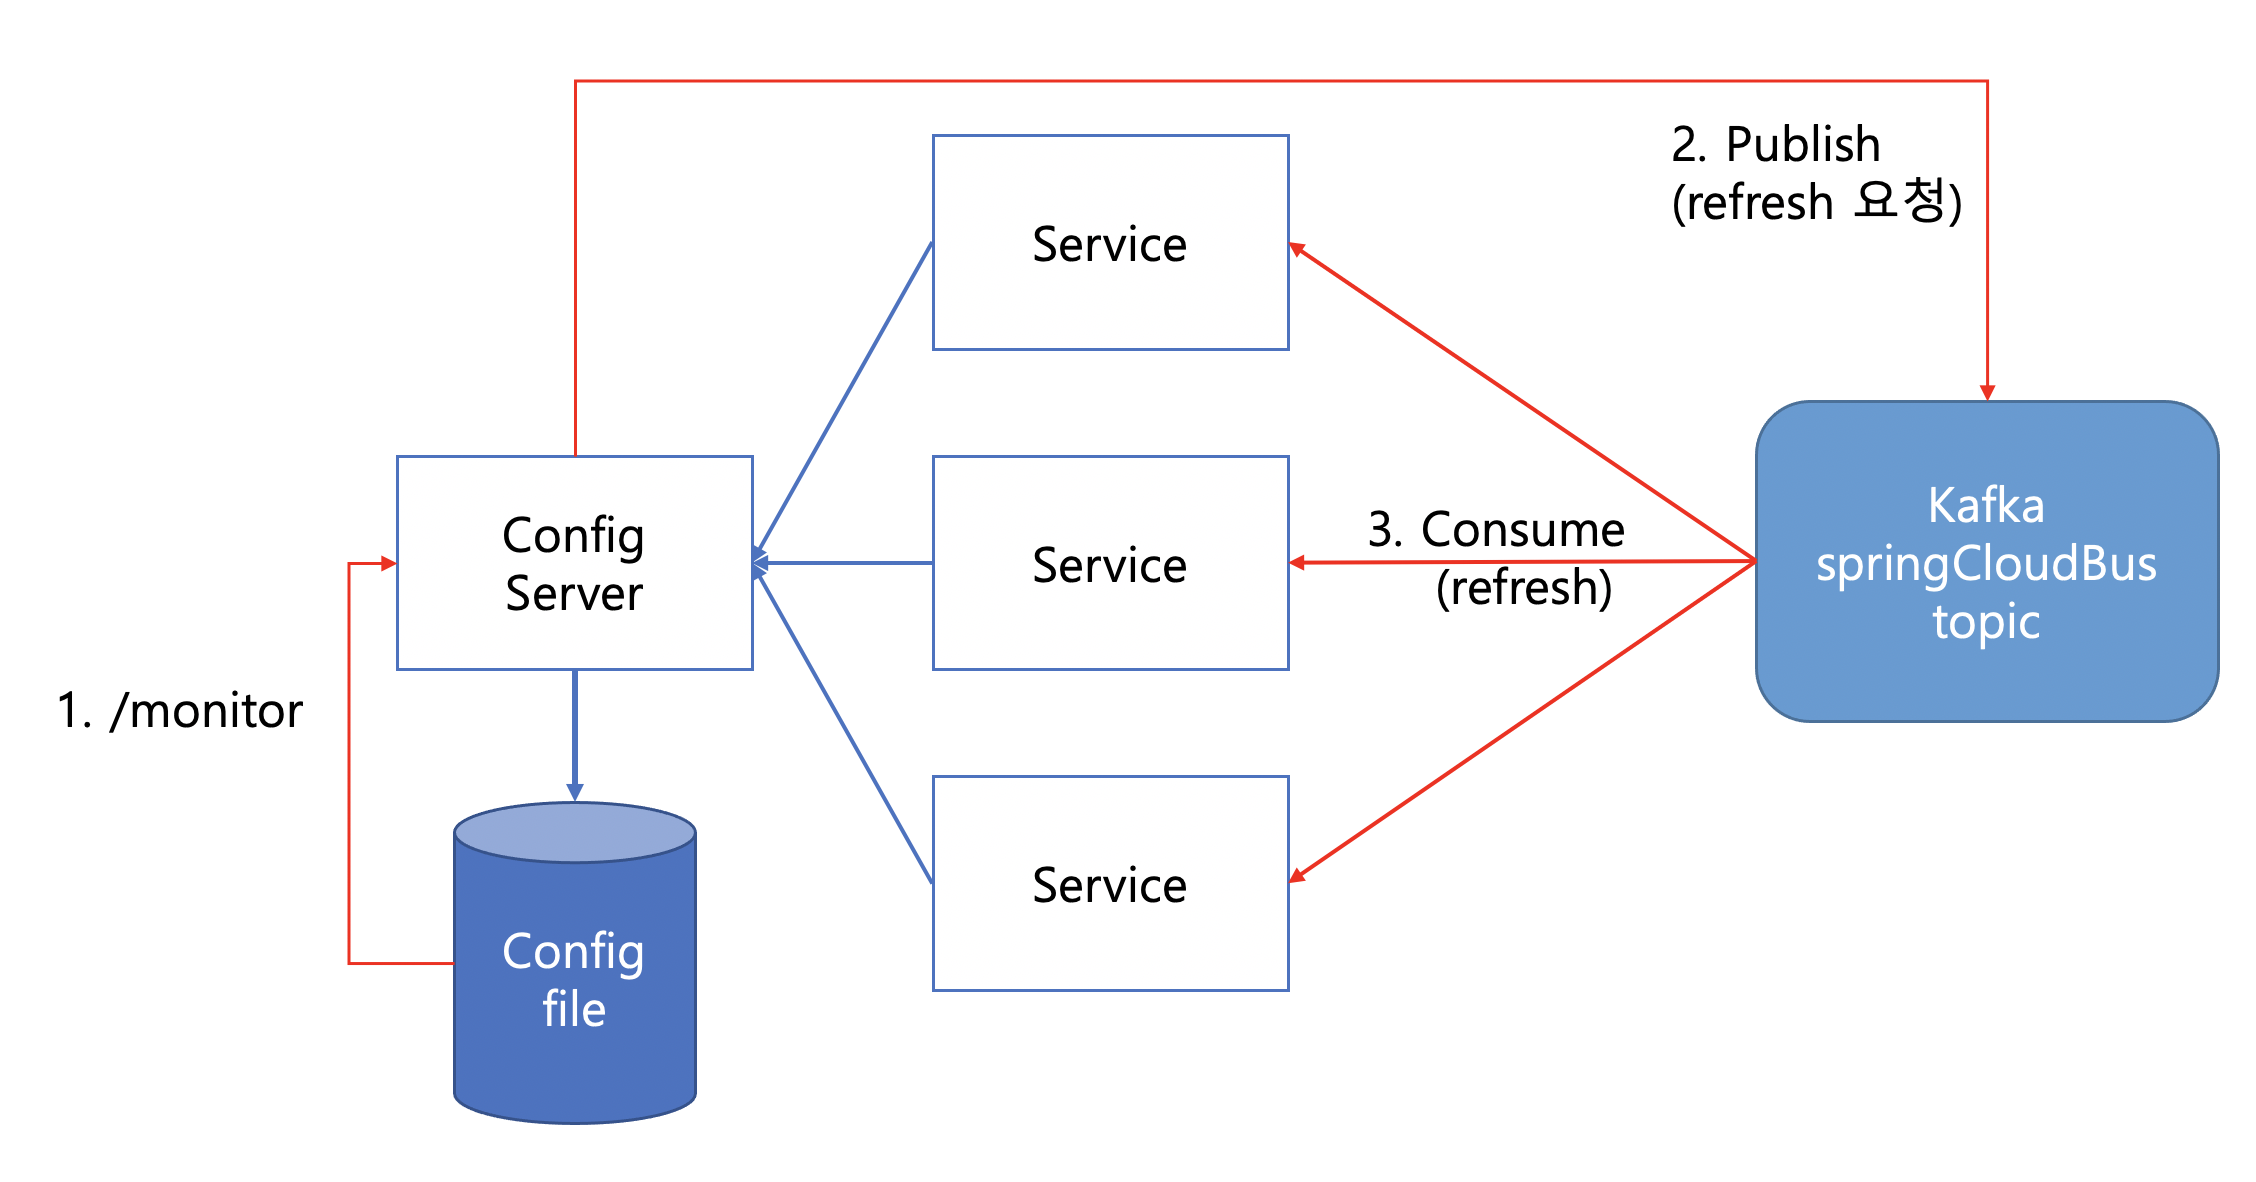
Spring Cloud Bus는 /actuator/busrefresh endpoint 호출로 모든 A 인스턴스의 /actuator/refresh가 호출한 것과 같은 효과를 줍니다.
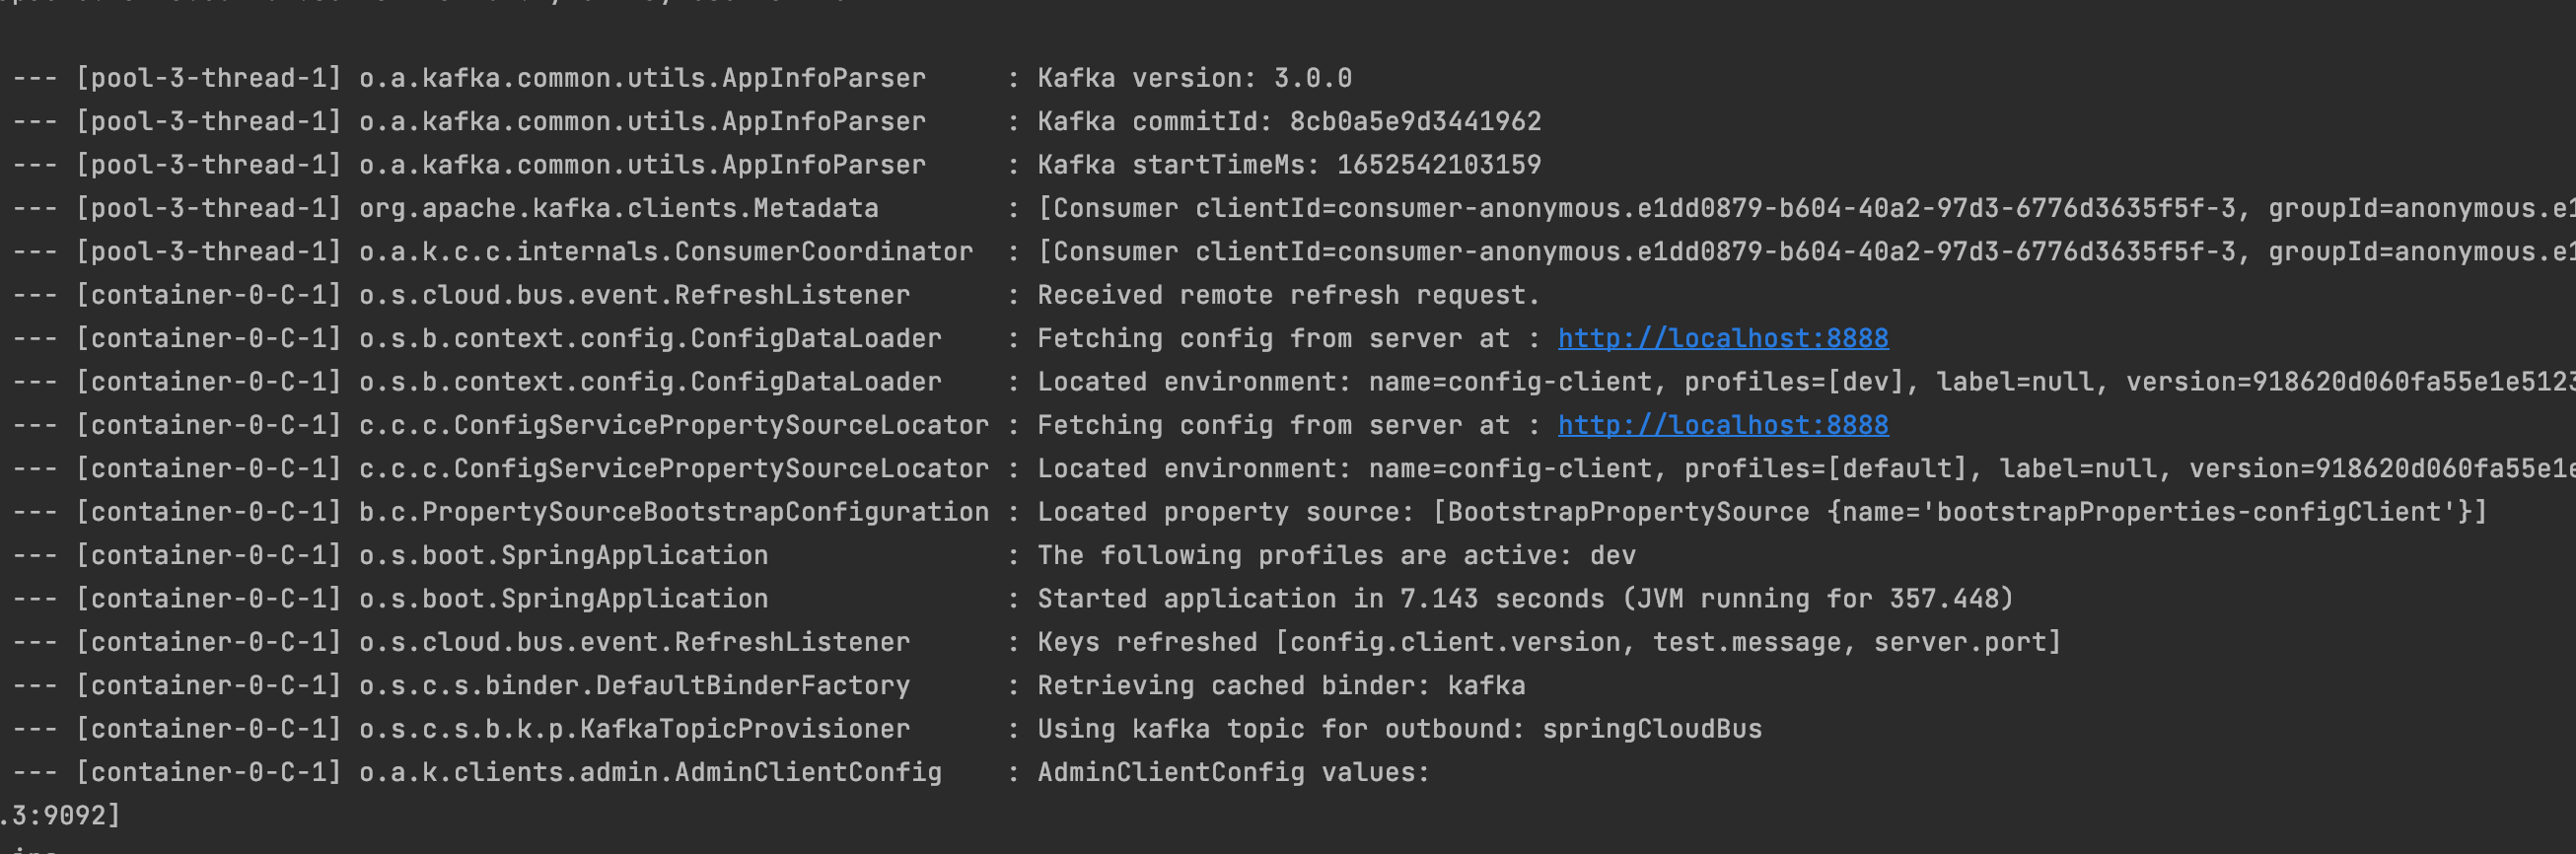
[그림 2]에서 어느 서비스 인스턴스에 /actuator/busrefresh 호출을 하면 설정해둔 카프카의 토픽에 publish 합니다.
동일한 카프카를 보면서 같은 서비스 이름을 가지는 서버들은 해당 토픽 메시지를 consume 받은 뒤 refresh 합니다.
Kafka
docker-compose.yml
version: '2'
services:
  zookeeper:
    container_name: local-zookeeper
    image: wurstmeister/zookeeper:3.4.6
    ports:
      - "2181:2181"
  kafka:
    build: .
    container_name: local-kafka
    image: wurstmeister/kafka:2.13-2.8.1
    depends_on:
      - zookeeper
    ports:
      - "9092:9092"
    environment:
      KAFKA_ADVERTISED_HOST_NAME: 127.0.0.1
      KAFKA_ADVERTISED_PORT: 9092
      KAFKA_CREATE_TOPICS: "springCloudBus:1:1"
      KAFKA_ZOOKEEPER_CONNECT: zookeeper:2181
      KAFKA_LOG_DIRS: "/kafka/logs"
    volumes:
      - /var/run/docker.sock:/var/run/docker.sock
docker, docker-compose 설치 후 위와 같이 docker-compose.yml를 작성합니다.
services.kafka.environment.KAFKA_CREATE_TOPICS : 토픽을 생성합니다. 네이밍 규칙은 "topic 이름:partition 수:Replica 수" 입니다. "springCloudBus" 토픽을 사용할 예정입니다.
Config Client
bus-kafka 의존성 추가
dependencies {
    // ...
    implementation("org.springframework.cloud:spring-cloud-starter-bus-kafka") // 의존성 추가
}
프로퍼티 추가
spring:
  config:
    bus:
      destination: springCloudBus # 추가
  kafka:
    bootstrap-servers: 127.0.0.1:9092 # 추가


management:
  endpoints:
    web:
      exposure:
        include: refresh, busrefresh # busrefresh 추가
spring.config.bus.destination : kafka topic name 이름입니다. default 값은 springCloudBus 입니다.
spring.kafka.bootstrap-servers : kafka 서버 정보 입니다.
테스트
$ docker-compose up -d먼저 카프카 docker-compose.yml 작성한 폴더 위치로 이동 후 도커컴포즈를 up 해줍니다. = 카프카를 띄운다.
# config-client bootstrap.yml
server:
  port: 9901
# config-client bootstrap.yml
server:
port: 9902client server의 server.port를 수정하며 9901, 9902 포트를 사용하는 두 대의 서버를 띄웁니다.
###
GET http://localhost:9901/test
###
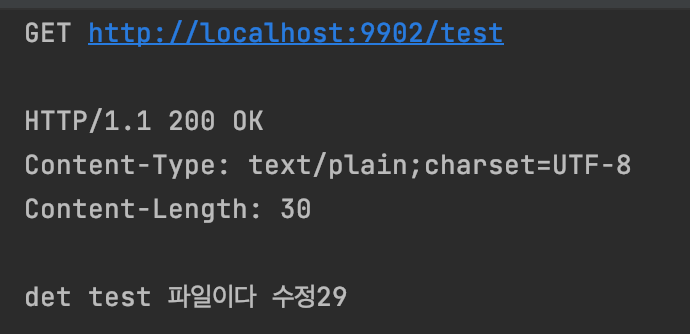
GET http://localhost:9902/test
변경하기 전 config 정보를 확인합니다.
config file을 수정합니다.
POST http://localhost:9901/actuator/busrefresh9901 포트에 떠 있는 서버의 busrefresh endpoint를 호출합니다.

이후 9901, 9902 서버의 test API 를 호출하면 busrefresh를 호출했던 9901 포트 서버뿐만 아니라 호출하지 않았던 9902포트 서버도 컨피그 값이 변경되어 있음을 확인할 수 있습니다.
참고 커밋 : https://github.com/fpdjsns/MSA-Project/commit/67ce33e00789053c8c00fe9242ea735874d8b629
Spring Cloud Config Monitor, Git 변경사항 감지
bus를 적용 후 config file을 수정한 후 수정된 서비스들의 /busrefresh endpoint를 호출해야 하면 해당 서비스들의 변경사항이 적용되는 것까지 진행하였습니다.
하지만 자동화에 목말라 있는 개발자들은 bus를 사용하고도 부족함을 느낍니다.
config file을 변경했으면 이를 알아서 감지해서 변경된 서버들이 refresh 되어야 만족함을 느낄 것입니다.
이를 위해 spring cloud config monitor 라이브러리를 제공합니다.
config file 레파지토리에 {config server}/monitor 를 호출하는 웹훅을 걸어두면 우리가 원하는 변경 자동감지&반영을 할 수 있습니다.
Config Server
의존성 추가
dependencies {
    // ...
    implementation("org.springframework.cloud:spring-cloud-starter-bus-kafka") // add
    implementation("org.springframework.cloud:spring-cloud-config-monitor") // add
    implementation("org.springframework.cloud:spring-cloud-starter-stream-kafka") // add
}
프로퍼티 추가
spring:
  kafka:
    bootstrap-servers: 127.0.0.1:9092 // 추가
config server 에도 카프카 정보를 추가합니다.
Config Server 추가작업
config-client-dev.yml 파일 수정시
[
  "config:client-dev",
  "config-client:dev",
  "config-client-dev"
]
위와 같은 서비스 네임을 가진 서버들이 refresh가 되게 됩니다.
하지만 뒤에 환경(dev) 정보가 붙어있기 때문에 변경되어야 하는 config-client 서버는 refresh가 발생하지 않습니다.
[
  "config-client",
  "config:client-dev",
  "config-client:dev",
  "config-client-dev"
]
config-client 추가하게 PropertyPathEndpoint 로직을 수정할 필요가 있습니다.
refresh 대상이 되는 서비스 이름을 만드는 작업은 PropertyPathEndpoint.notifyByPath 함수에서 guessServiceName 함수를 호출해서 하고 있습니다. notifyByPath 함수를 수정해서 환경정보가 붙지 않은 서비스이름도 등록되게 수정해보겠습니다.
환경정보를 제거한 서비스이름을 등록하는 방법도 있지만 컨피그에 등록해둔 환경 정보만 제거하게 제한을 두면 사이드 이펙트를 줄일 수 있지 않을까 싶어 해당 방법으로 코딩하였습니다.
@ConstructorBinding
@ConfigurationProperties(prefix = "spring.cloud.config.monitor.custom")
data class CustomMonitorProperties(
    var profiles: List<String> = mutableListOf("dev", "alpha", "real", "beta")
)
환경정보의 컨피그 값 이름은 spring.cloud.config.monitor.custom.profiles 로 만들었습니다.
디폴트 값은 dev, alpha, real, beta 입니다.
@RestController
@RequestMapping(path = "${spring.cloud.config.monitor.endpoint.path:}/monitor")
public class PropertyPathEndpoint implements ApplicationEventPublisherAware {
    // ...

    @Autowired
    private CustomMonitorProperties customMonitorProperties;

    // ...

    @PostMapping
    public Set<String> notifyByPath(@RequestHeader HttpHeaders headers, @RequestBody Map<String, Object> request) {
        PropertyPathNotification notification = this.extractor.extract(headers, request);
        if (notification != null) {

            Set<String> services = new LinkedHashSet<>();

            for (String path : notification.getPaths()) {
                guessApplicationName(path).ifPresent(name -> services.add(name)); // add
                services.addAll(guessServiceName(path));
            }

            // ...
        }
        return Collections.emptySet();
    }

    // ...

    // add
    /**
     * remove "-{{env}}.yml" postfix
     */
    public Optional<String> guessApplicationName(String path) {
        for (String profile : customMonitorProperties.getProfiles()) {
            int index = path.lastIndexOf("-" + profile + ".yml");
            if (index == -1) {
                continue;
            }
            return Optional.of(path.substring(0, index));
        }
        return Optional.empty();
    }
}
guessApplicationName 함수를 추가로 만들어 추가할 이름이 있는 경우 services set에 추가하게 PropertyPathNotification 클래스를 수정하였습니다.
spring:
  main:
    allow-bean-definition-overriding: true // add
기존에 존재하던 PropertyPathEndPoint bean과 동일한 bean을 만들어 등록했기 때문에 충돌이 발생합니다.
이를 방지하기 위해 재정의 옵션을 활성화되어야 하는데 Spring Boot 2.1 부터 의도치않은 빈재정의를 감지하기 위해 빈재정의 기본값을 비활성화로 지정하였습니다.
spring.main.allow-bean-definition-overriding 옵션을 true로 세팅해주면 빈재정의를 허용할 수 있습니다.
테스트
config 변경이 반영되었는지 확인해야 하므로 어플리케이션들은 마찬가지로 미리 구동해둡니다.
GET http://localhost:9901/test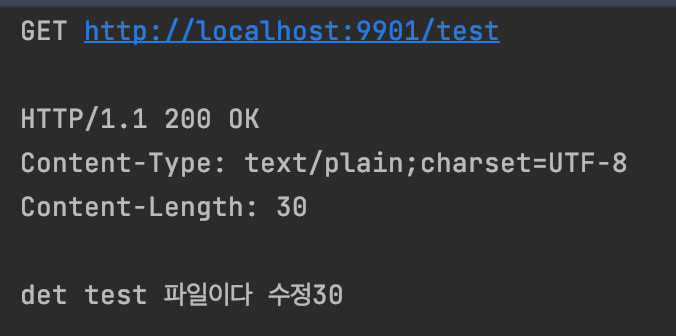
기존 적용된 컨피그 값이 무엇인지 확인해둡니다.
POST http://localhost:8888/monitor
Accept: */*
content-type: application/json
X-GitHub-Event: push
X-GitHub-Hook-Installation-Target-Type: repository

{
  "commits": [
    {
      "modified": [
        "config-client-dev.yml"
      ]
    }
  ],
  "head_commit": {
    "modified": [
      "config-client-dev.yml"
    ]
  }
}
실제로 깃헙 웹훅을 등록한 뒤 config file 레포의 config-client-dev.yml을 바꿔보셔도 되고 위 요청을 호출해보셔도 됩니다.
GITHUB 웹훅 세팅
깃헙에서 웹훅을 등록하기 위해서는 도메인이 필요합니다.
도메인이 있으면 이를 사용하면 되지만 저는 별도의 도메인이 없기 때문에 ngrok을 사용하였습니다.
ngrok을 설치 & 회원가입 후 config-server port인 8888과 포트포워딩이 필요하므로 아래와 같은 명령어를 실행해 줍니다.
$ ngrok http 8888그럼 도메인 주소가 생성되는데 이를 복사합니다.
config file의 변경을 감지해야 하므로 config-file 레포의 웹훅을 등록합니다.
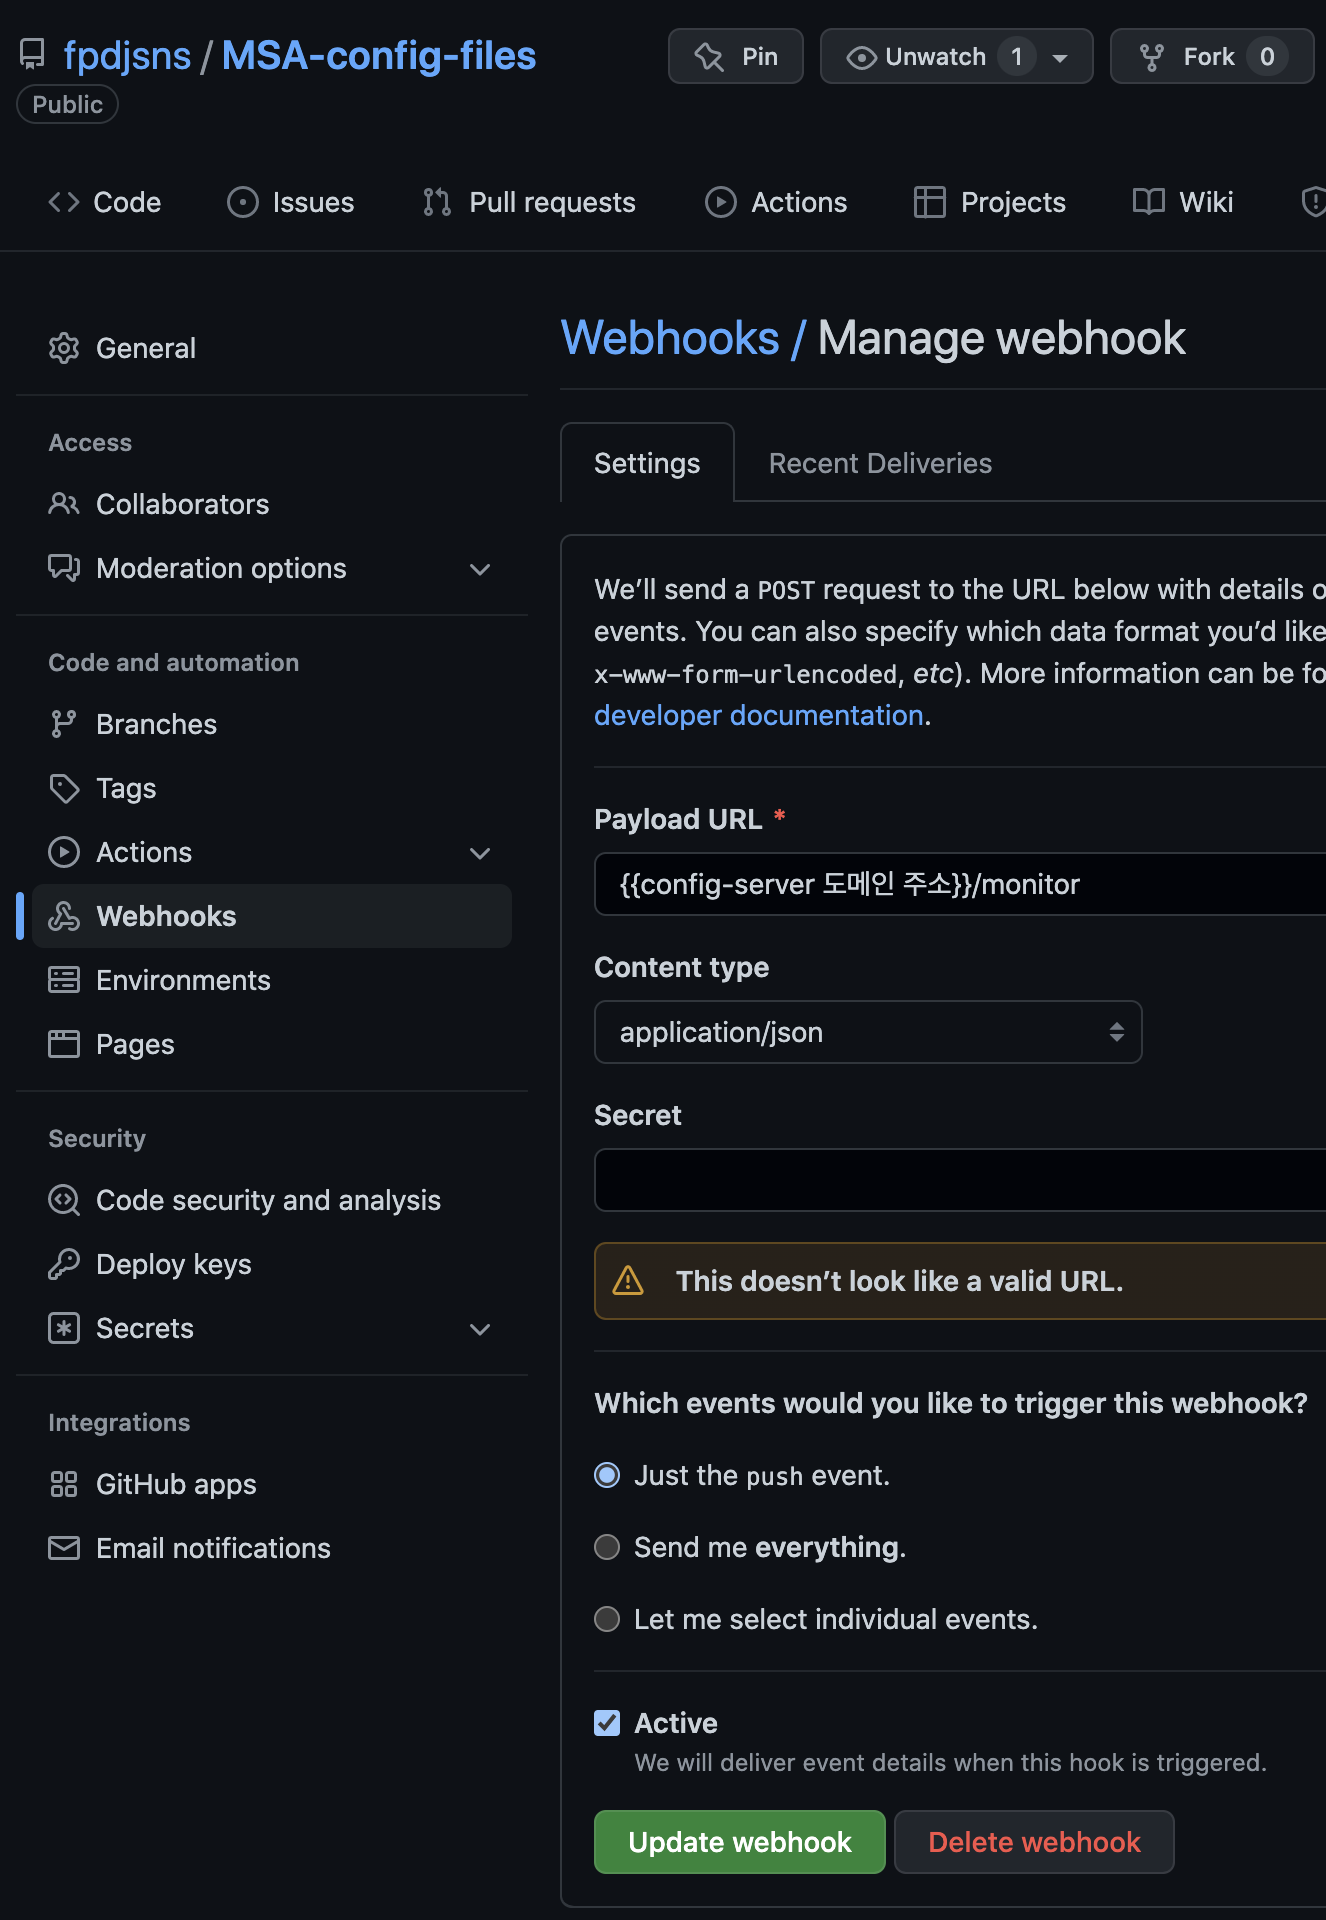
위와 같이 설정한 후 웹훅을 등록하면 yml 변경시 변경사항을 body에 담은 monitor API가 호출됩니다.
config-client 확인

config 수정 후
GET http://localhost:9901/test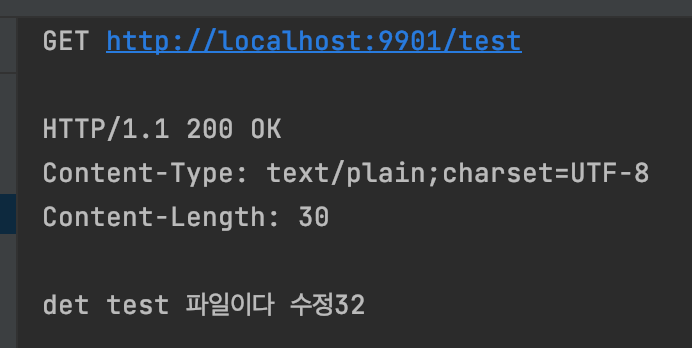
다시 컨피그 값을 확인해 보면 변경된 값이 잘 적용된 걸 확인할 수 있습니다.
참고 커밋 : https://github.com/fpdjsns/MSA-Project/commit/16962189f0f828767464c17247da2a59a5009933
예제 프로젝트 깃허브: https://github.com/fpdjsns/MSA-Project/tree/main/config
참고
- https://happycloud-lee.tistory.com/212
- https://github.com/spring-cloud/spring-cloud-config
- https://chathurangat.wordpress.com/2018/07/21/spring-cloud-config-using-git-webhook-to-auto-refresh-the-config-changes-with-spring-cloud-stream-spring-cloud-bus-and-rabbitmq-part-3/
- https://madplay.github.io/post/spring-cloud-config-using-git-webhook-to-auto-refresh
- https://pearlluck.tistory.com/638
- https://jaehun2841.github.io/2022/03/10/2022-03-11-spring-cloud-bus/
- https://www.youtube.com/watch?v=8Gj4ROwBAgw
- https://techblog.woowahan.com/7724/
- https://cloud.spring.io/spring-cloud-config/reference/html/#_quick_start
'Back-End (web)' 카테고리의 다른 글
| Intellij에서 Go로 Hello World 출력하기 (0) | 2023.07.30 |
|---|---|
| [Spring] Spring Boot 3를 위한 RestDocs, openAPI3 버전 업그레이드 (2) | 2023.03.30 |
| [Kotlin] Collection - Fold, Reduce (0) | 2022.01.16 |
| PyCharm 입출력 파일 설정 (0) | 2022.01.08 |
| [Kotlin] Collection - associateBy, associateWith, associate (0) | 2021.12.30 |


댓글