모달(Modal)이 아닌 window.open으로 새 창을 띄우는 팝업 예제이다.
데이터 전달 방법
앱(부모) -> 팝업 : Url path, query param
팝업 -> 앱(부모) : vuex mutation
팝업에서 앱으로 데이터를 전송할 때 데이터 버스를 쓸까 하다가 그냥 기존에 세팅되어 있는 vuex를 쓰기로 했다.
Vuex 데이터 추가
// src/store/modules/popup.ts
export const namespaced = true;

interface State {
  name: string;
}

export const state: State = {
  name: "default name"
};

export const mutations = {
  SET_NAME(state: State, name: string) {
    state.name = name;
  }
};
// src/store/index.ts
export const store = new Vuex.Store({
modules: {
product,
popup // add
},popup에서 사용할 vuex state, mutations을 추가한 뒤 module에 popup이라는 이름으로 등록한다.
state는 간단하게 문자열 name만 사용하기로 하고 기본 값은 default name으로 초기화 시켜주었다.
Popup component 생성
<!-- src/components/Popup/Popup.html -->
<div>
  Popup Component
  My Name is <input v-model="name"></input> !!
  <button @click="sendData">Send name to Parent</button>
  <button @click="close">Close</button>
</div>
// src/components/Popup/index.ts
import { Vue, Component, Prop } from "vue-property-decorator";
@Component({
template: require("./Popup.html")
})
export default class Popup extends Vue {
private name: string = "";
private mounted() {
const name = this.$route.query.name;
if (typeof name === "string") {
this.name = name;
}
}
private sendData() {
window.opener.app.$root.$store.commit("popup/SET_NAME", this.name);
window.close();
}
private close() {
window.close();
}
}Popup 컴포넌트를 새로 생성했다.
화면에는 name을 입력받는 input 박스.
호출한 부모 창에 데이터를 전송하고 팝업을 닫는 Send name to Parent 버튼.
팝업을 닫는 Close 버튼을 만들었다.

여기서 중요한 부분은
window.opener.app.$root.$store.commit("popup/SET_NAME", this.name);mutation(commit)으로 name을 갱신하는 이 부분이다.
window.opener는 자신을 연 부모를 찾는 것이고 그 다음 나오는 app 은 찾아갈수 있게 내가 등록한 것이다.
// src/index.ts
let v = new Vue({
  el: "#app",
  template: `
    <div>
    <Index/>
    </div>`,
  components: {
    Index
  },
  store,
  router
});

(<any>window).app = v; // app이름으로 Vue 앱을 등록한다.
index.ts 에서 마지막 줄과 같이 등록하면 window.opener.app으로 부모 앱을 인식할 수 있다.
// src/routes/index.ts
export const router = new VueRouter({
    // add popup path
    {
      path: "/popup",
      component: Popup,
      name: "popup"
    },
부모 앱에서 팝업을 열 수 있게 라우터에 popup path를 추가한다.
Popup을 여는 컴포넌트 생성
<!--src/components/Test1/Test1.html-->

<!-- add -->
<div>
    My Name is <span style="color: red">{{ name }}</span>
</div>
<button @click="openPopup">open popup - get name</button>
// src/components/TEst1/index.ts
export default class Test1 extends Vue {
// add
@State("name", { namespace: "popup" })
private name!: string;
private openPopup() {
window.open(`/popup?name=${this.name}`, "Popup");
}
}popup을 여는 부모 컴포넌트는 기존에 만들어둔 Test1 컴포넌트에 버튼을 추가하였다.
open popup - get name 버튼을 누르면 popup이 열린다.
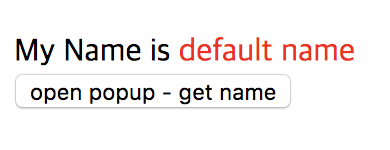
결과 확인

부모 컴포넌트(/test)로 이동하면 위와 같은 화면이 보인다.
name state의 기본 값을 default name이라고 해두었기 때문에 빨간 글씨로 이를 확인할 수 있다.
open popup 버튼을 눌러보자.
팝업을 열면 위와 같은 화면이 보인다.
/popup?name=default%20name 이런 path로 열릴 것이기 때문에 default%20name을 디코딩한 값이 input box에 보일 것이다.

input box 값을 change Name으로 변경하고 Send name to Parent 버튼을 눌러보자.

default name -> change Name으로 변경된 것을 확인할 수 있다.
참고 깃허브 : add Popup example, modify get query error
'Front-End (web) > Vue.js Typescript' 카테고리의 다른 글
| [Vue.js/Typescript] 7. Props, Emit (0) | 2019.08.14 |
|---|---|
| [Vue.js/Typescript] 6. ES Lint (0) | 2019.08.10 |
| [Vue.js/Typescript] 4. Vue-router (0) | 2019.03.11 |
| [Vue.js/Typescript] 3. Vuex - State, Getter (0) | 2019.01.26 |
| [Vue.js/Typescript/Webpack] 2. webpack-dev-server 설정 (0) | 2018.11.26 |


댓글