320x100
// src/components/Todo/index.ts

// ...
export default class Todo extends Vue {

    // Style
    styleTable: object = {
        borderCollapse: 'collapse',
        padding: '10px',
        border: '2px solid #ddd',
        borderTop: '3px solid #fb7399',
    }

    styleThead: object = {
        color: '#fb7399',
        background: '#f7e6ec',
        textAlign: 'center',
    }

    styleTbody: object = {
        color: '#0094D7'
    }

    styleTh: object = {
        padding: '5px',
    }

}
// src/components/Todo/Todo.html
<div>
TODO 리스트
<table class="table" :style="styleTable">
<thead :style="styleThead">
<tr>
<th>
<input type="checkbox">
</th>
<th>name</th>
<th>todo</th>
</tr>
</thead>
<tbody :style="styleTbody">
<tr v-for="item in todos">
<td>
<input type="checkbox" :value="item.id">
</td>
<td>{{item.name}}</td>
<td>{{item.todo}}</td>
</tr>
</tbody>
</table>
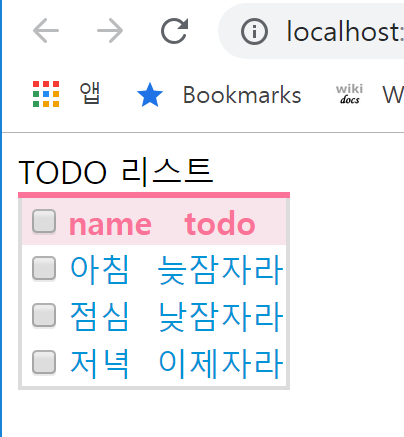
</div>테이블 스타일을 조금 바꿔봤다.

CSS는 너무 어려운 것이다.
// src/components/Todo/index.ts
// ...
export default class Todo extends Vue {
// ...
// add
name: string = '';
todo: string = '';
addTodo() {
this.$store.dispatch('todo/addTodo', new TodoItem(this.name, this.todo));
this.name = ''; this.todo = '';
}
}// src/components/Todo/Todo.html
<div>
// add
<input v-model="name" placeholder="name">
<input v-model="todo" placeholder="todo">
<button @click = "addTodo()">추가해라</button>
// ...
</div>name, todo 입력 폼을 만든다.
그리고 클릭시 state에 있는 addTodo action을 호출한다.
// src/store/modules/todo.ts

// ...

export const mutations = {
	// add
    ADD_TODO(state: State, todo: TodoItem) {
        todo.id = state.todos.length + 1;
        state.todos.push(todo);
    }

};

export const actions: ActionTree<State, any> = {

	// add
    addTodo({ commit }, todo: TodoItem): void {
        commit('ADD_TODO', todo);
    }
}
action은 위와 같이 만들어뒀다.
api 호출은 하지 않기 때문에 브라우저가 갱신될 때 todo 내용은 날아간다.
다음에 api 호출까지 추가하자.


참고 깃허브
320x100
'Project > 홈페이지' 카테고리의 다른 글
| [TODO] Google Login (OAuth) (0) | 2019.04.10 |
|---|---|
| [TODO] table, Style object (0) | 2019.03.28 |
| [TODO] favicon 이미지 추가 (2) | 2019.03.25 |
| [TODO] Docker 배포환경 설정 (0) | 2019.03.25 |
| [TODO] google sheet API 연동 (0) | 2019.03.17 |


댓글